Quickstart
Intro
Docklet is an operating system for mini-datacener. Its goal is to help multi-user share cluster resources effectively. Unlike the "application framework oriented" cluster manager such as Mesos and Yarn, Docklet is user oriented. In Docklet, every user has their own private virtual cluster (vcluster), which consists of a number of virtual Linux container nodes distributed over the physical cluster. Every vcluster is separated from others and can be operated like a real physical cluster. Therefore, most applications, especially those requiring a cluster environment, can run in vcluster seamlessly.
Docklet provides a base image for creating virtual nodes. This image has pre-installed a lot of mainstream development tools and frameworks, including gcc/g++, openjdk, python3, R, MPI, scala, ruby, php, node.js, texlive, mpich2, spark, scipy/numpy/matplotlib/pandas/sympy/scikit-learn, jupyter notebook, etc. Users can get a ready vcluster with just one click within 1 second.
The users are free to install their specific software in their vcluster. Docklet supports operating through web terminal. Users can do their work as an administrator working on a console. The base image system is ubuntu. The recommended way of installing new software is by apt-get.
The users manage and use their vcluster all through web. The only client tool needed is a modern web browser, like safari, firefox, chrome. The integrated jupyter notebook provides a web workspace. By visiting the workspace, users can do coding, debugging and testing of their programs online. The python scipy series of tools can even display graphical pictures in the browser. Therefore, it is ideal for data analysis and processing.
Docklet only need one public IP address. The vclusters are configured to use private IP address range, e.g., 172.16.0.0/16, 192.168.0.0/16, 10.0.0.0/8. A proxy is setup to help users visit their vclusters behind the firewall/gateway.
The Docklet system runtime consists of four components:
- distributed file system server
- etcd server
- docklet supermaster, master
- docklet worker
Architecture
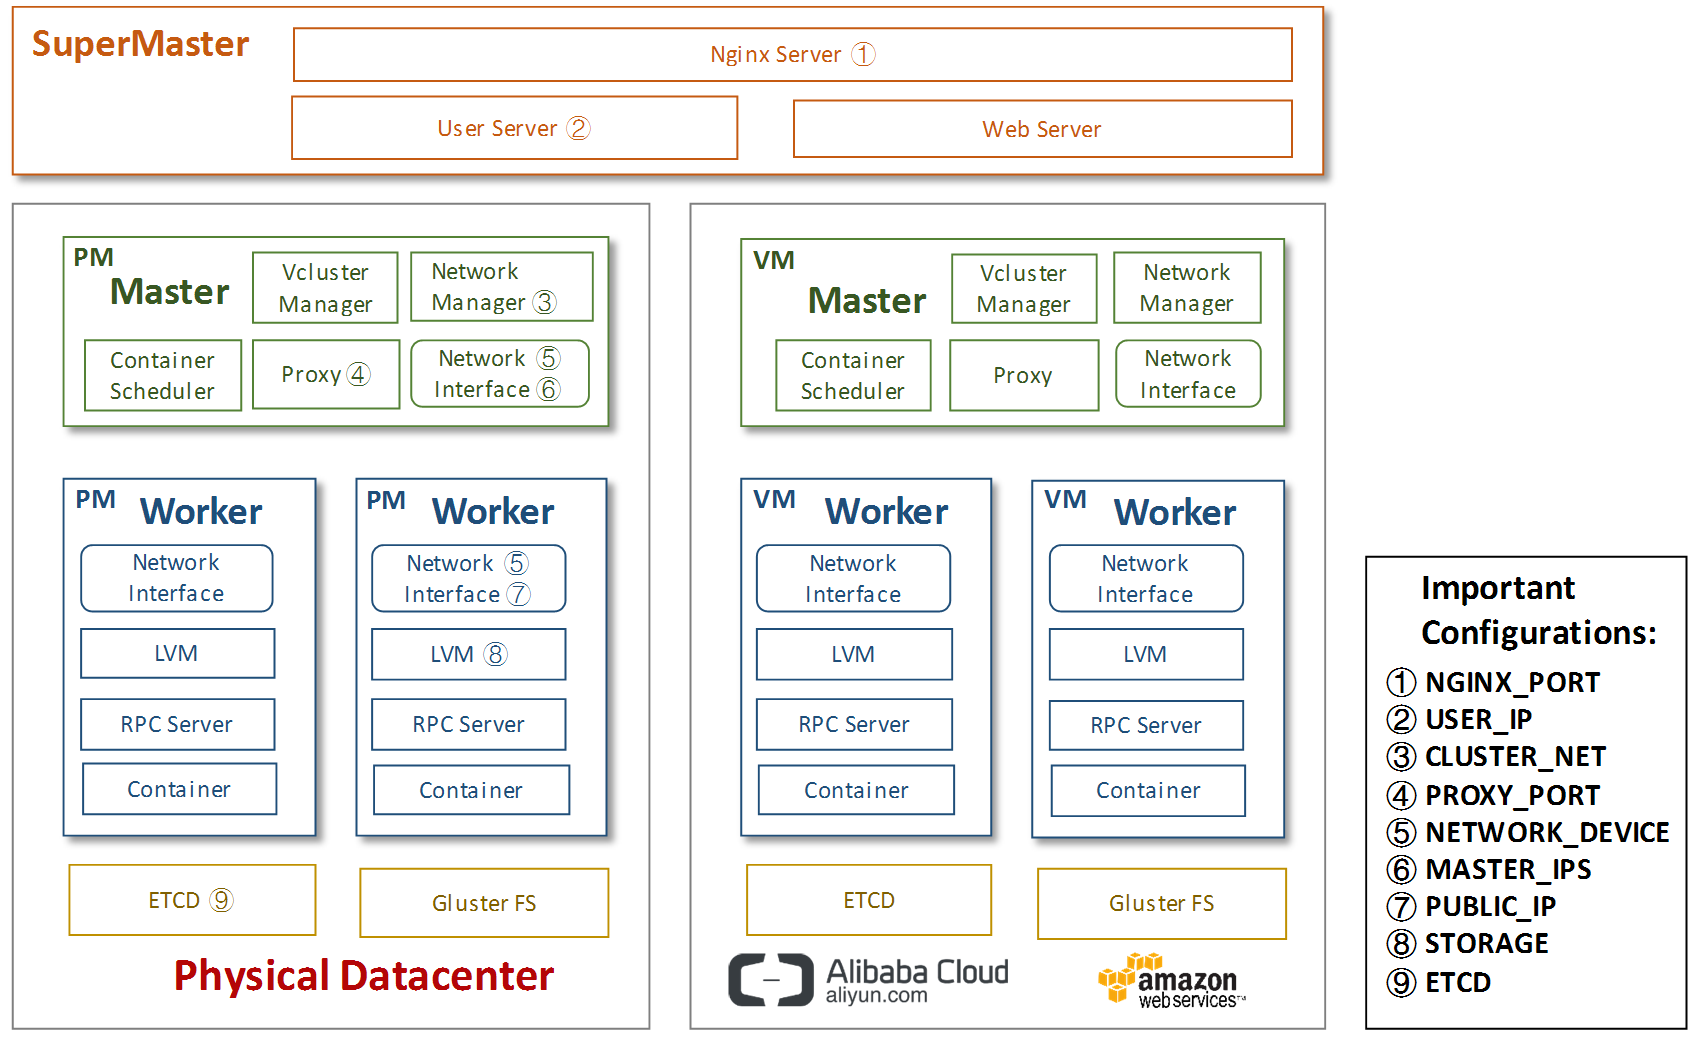
For detailed information about configurations, please see Config.
Install
Currently the docklet runtime is recommend to run in Unbuntu 15.10+.
Ensure that python3.5 is the default python3 version.
Unpack the docklet tarball to a directory ( /root/docklet as an example), will get
readme.md
prepare.sh
conf/
    container.conf
    docklet.conf.template
    nginx_docklet.conf
    lxc-script/
bin/
    docklet-master
    docklet-supermaster
    docklet-worker
src/
    httprest.py
    worker.py
    ...
web/
    web.py
doc/
user/
    user.py
tools/
    etcd-multi-nodes.sh
    etcd-one-node.sh
    update-basefs.sh
    start_jupyter.sh
    ...
If it is the first time install, users should run prepare.sh to install necessary packages automatically. Note it may need to run this script several times to successfully install all the needed packages.
A root users will be created for managing the system. The password is
recorded in FS_PREFIX/local/generated_password.txt .
Config
The main configuration file of docklet is conf/docklet.conf. Most default setting works for a single host environment.
First copy docklet.conf.template to get docklet.conf.
The following settings should be taken care of:
- NETWORK_DEVICE : the network device to use.
- ETCD : the etcd server address. For distributed muli hosts environment, it should be one of the ETCD public server address. For single host environment, the default value should be OK.
- STORAGE : using disk or file to storage persistent data, for single host, file is convenient.
- FS_PREFIX: the working dir of docklet runtime. default is /opt/docklet.
- CLUSTER_NET: the vcluster network ip address range, default is 172.16.0.1/16. This network range should all be allocated to and managed by docklet.
- PROXY_PORT : the public port of docklet. Users use this port to visit the docklet system.
- PORTAL_URL : the portal of the system. Users access the system by visiting this address. If the system is behind a firewall, then a reverse proxy should be setup.
- NGINX_PORT : the access port of the public portal. User use this port to visit docklet system.
- DISTRIBUTED_GATEWAY : whether the users' gateways are distributed or not. Both master and worker must be set by same value.
- PUBLIC_IP : public ip of this machine. If DISTRIBUTED_GATEWAY is True, users' gateways can be setup on this machine. Users can visit this machine by the public ip. default: IP of NETWORK_DEVICE.
- USER_IP : the ip of user server. default : localhost
- MASTER_IPS : tell the web server the ips of all the cluster master.
- AUTH_KEY: the key to request users server from master, or to request master from users server. Please set the same value on each machine. Please don't use the default value.
Start
Distributed file system
For multi hosts distributed environment, a distributed file system is needed to store global data. Currently, glusterfs has been tested. Lets presume the file system server export filesystem as nfs fileserver:/pub :
In each physical host to run docklet, mount fileserver:/pub to FS_PEFIX/global .
For single host environment, it need not to configure distributed file system.
Etcd
For single host environment, start tools/etcd-one-node.sh . Some recent
Ubuntu releases have included etcd in the repository, just apt-get
install etcd, and it need not to start etcd manually. For others, you should install
etcd manually.
For multi hosts distributed environment, start tools/etcd-multi-nodes.sh in each etcd server hosts. This scripts requires users providing the etcd server address as parameters.
Supermaster
Supermaster is a server consist of web server, user server and a master server instance.
If it is the first time you start docklet, run bin/docklet-supermaster init
to init and start a docklet master, web server and user server. Otherwise, run
bin/docklet-supermaster start. When you start a supermaster, you don't
need to start an extra master in the same cluster.
Master
A master manages all the workers in one data center. Docklet can manage several data centers, each data center has one master server. But a docklet system will only have one supermaster.
First, select a server with 2 network interface card, one having a public IP address/url, e.g., docklet.info; the other having a private IP address, e.g., 172.16.0.1. This server will be the master.
If it is the first time you start docklet, run bin/docklet-master init
to init and start docklet master. Otherwise, run bin/docklet-master start,
which will start master in recovery mode in background using
conf/docklet.conf. It means docklet will recover workspaces existed.(Note: if docklet
will run in the distributed gateway mode and recovery mode, please start the workers first.)
This script in fact will start three daemons: the docklet master of httprest.py, the configurable-http-proxy and the docklet web of web.py.
Please fill the USER_IP and USER_PORT in conf/docklet.conf, it is the ip and port of user server. By default, it is localhost and 9100
You can check the daemon status by running bin/docklet-master status
If the master failed to start, you could try bin/docklet-master init
to initialize the whole system.
More usages can be found by typing bin/docklet-master
The master logs are in FS_PREFIX/local/log/docklet-master.log and docklet-web.log.
Worker
Worker needs a basefs image to boot container.
You can create such an image with lxc-create -n test -t download,
and then copy the rootfs to FS_PREFIX/local, and renamed rootfs
to basefs.
Note the jupyterhub package must be installed for this image. And the
start script tools/start_jupyter.sh should be placed at
basefs/home/jupyter.
You can check and run tools/update-basefs.sh to update basefs.
Run bin/docklet-worker start, will start worker in background.
You can check the daemon status by running bin/docklet-worker status
More usages can be found by typing bin/docklet-worker
The log is in FS_PREFIX/local/log/docklet-worker.log
Currently, the worker must run after the master has been started.
Usage
Open a browser, visiting the address specified by PORTAL_URL ,
e.g., http://docklet.info/
If the system is just deployed in single host for testing purpose,
then the PORTAL_URL defaults to http://MASTER_IP:PROXY_PORT,
e.g., http://localhost:8000.
That is it.